Toyota Camry 5SFE Engine Timing Belt, Water Pump & Seal Replacement

Introduction

The Toyota 5SFE motor is a 4 cylinder 2.2 liter timing belt driven double overhead cam engine design. This motor is commonly found in the Camry, Celica, MR2 and RAV4 from 1990 to 2001. The engine is a Non-Interference type meaning damage to either the valves or pistons is unlikely to occur if the belt were to ever brake during vehicle operation. The outlined instructions can therefore be used on belts that have broken. Positioning the Camshaft Sprocket and the Crankshaft Pulley for Top-Dead-Center (TDC) alignment is all that is needed for broken belt replacement.
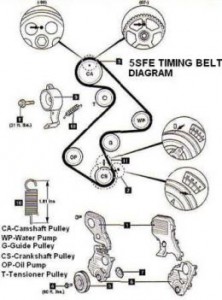
timing belt diagramExpect to spend approximately 3 hours for just a belt replacement. Replacement of the water pump (approximately 1/2 hour) and sprocket seals (approximately 1/2 or less per seal) can vary.

The belt replacement interval for the 5SFE engine is either 60,000 or 90,000 miles based on the year of vehicle manufacture. Perhaps the introduction of Highly Saturated Nitrile (HSN) Timing Belts adopted for used on Toyota vehicles raised the service interval. Also the time since last replacement should be considered as well. Belt replacement every 6 to 7 years is recommended if under the mileage threshold.

It is recommended that the two Idler Pulleys (one for belt tension and the other as a belt guide) be replaced with every belt change. If the bearings in any of the pulleys were to lose its lubricating properties, the pulley can either wobble placing undue stress on the timing belt or potentially seize guaranteeing belt failure. Worn bearings can be noticed by a pitched grinding noise during engine warm up. When whatever grease remaining inside the bearing lubricates the bearings through engine heat, the noise will disappear. This can be considered a warning to have the belt and bearings replaced as soon as feasible.

Although many dealerships and private service stations recommend Water Pump replacement with the Timing Belt, based on personal experience, the AISIN Water Pumps in Toyotas are very durable. If the coolant has been changed per manufacturer’s recommended interval, and no hard mineral water used, the pump seals and bearings should last over 150,000 miles. This is based on personal experience with many 5SFE belt replacements jobs. However, the pump can be examined for wear and leakage after the Timing Belt Cover has been removed with the Timing Belt. Look for leakage from the weep hole, any chirping noise from the pump when the engine is running and any drag on the pulley when turned by hand after the timing belt has been removed.

On 5SFE engines with over 100,000 miles, there is a good possibility of oil seal wear for the Camshaft, Crankshaft and Oil Pump. The seals are inexpensive but can be time consuming to replace. If the leakage is very bad, oil will get on your Timing Belt which may cause pre-mature belt failure. Moreover, check the Side Engine Control Rod (commonly referred to as the Dog Bone) along with the front engine mount which dampens the the forward and backward flexing of the engine. The rubber vibration dampener has a tendency to dry rot and crack with age. A simple test is to ‘blip’ the engine with the transmission in gear while having your foot on the brakes. If the engine lifts up and settles back down, a new front mount may be in order. Replacement is simple and straightforward. Otherwise, the exhaust system’s flex pipe may eventually crack leading to expensive repairs.

The cost of the belt and components can vary. For Japanese OEM parts: Mitsuboshi Timing Belt, Koyo Pulleys and Aisin Water Pump. Shop and compare prices including shipping costs for the best deals. The belt manufacturers Gates and Dayco, OEM suppliers for Car companies like Honda, are very good and their belts can be had for approximately $15. A Timing Belt Component Kit (Belt, Idle Pulley & Tensioner Pulley) around $50. Water Pumps … around $30, Oil Seals … around $5 each. The parts that comprise a Timing Belt Component Kit for the 5SFE is interchangeable with the following Toyota vehicles:

CELICA (1999)

CELICA GT (1987 – 1998)

CELICA GTS (1990 – 1992)

CELICA GTS SPORT (1990 – 1993)

CELICA ST (1987 – 1989)

MR2 (1991 – 1995)

RAV4 (1996 – 2000)

SOLARA (1999 – 2001)
How To Timing Belt Replacement – Camry / Avalon / ES 300 / Sienna / RX 300 / Solara – V6 – MZFE

Introduction

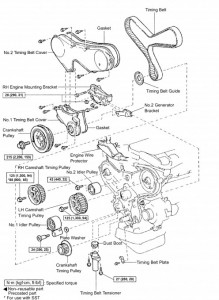
The Toyota MZFE engine is either a 3.0 or 3.3 liter transversely mounted, timing belt driven, 24 valve dual single overhead cam aluminum V6 design. This engine has been developed for use in many Toyota vehicles from 1994 to 2003. These include the Lexus ES300, RX300, and the ToyotHow To Timing Belt Replacement - Camry a Camry, Avalon and Solara. The 3.3 liter version was introduced as the 3MZFE. Most engine components in the 1MZFE are interchangeable with the 3MZFE including the timing belt, tensioner pulley and guide pulley. However, the 3MZFE has a different automatic belt tensioner configuration which is not covered in this article. Up until the introduction of VVTI (Variable Valve Timing) technology, the engine’s valve train were Non-Interference. This means that damage to either the valves or pistons will not occur if the timing belt were to brake during vehicle operation. The outlined timing belt replacement instructions can therefore be used on belts that have broken on non VVTI engines. Positioning the Camshaft Sprockets and the Crankshaft Pulley alignment marks to Top-Dead-Center (TDC) is all that is needed before the new belt is installed. A compression leakage test can be performed after belt installation to verify the integrity of the valves.

Toyota recommends belt replacement at or over 90,000 miles. Of the MZFE engines that were worked on, all cars under 200,000 miles had good operating water pumps. Over 150,000 miles, some of the guide and tensioner pulleys were indicating signs of wear and needed replacement.

Allocate 3 or more hours for just a belt replacement. Paint marks on the belt where it meets the crankshaft and camshaft pulleys will eliminate a lot of grief if any of these pulleys were to move after belt removal and during new belt installation.

1MZFE Timing Belt Components

4306044_f496

Tools and Parts Needed

Tools

Impact Driver (Electric, Compressed Air, or Mechanical)

1/2″ Breaker Bar (if no Impact Driver available used for Crankshaft Pulley Bolt removal)

1/2″ & 3/8″ drive Socket Wrenches

Metric Box Wrenches & Sockets

1/2″ & 3/8″ Wrench Extensions

Screw Drivers

Jack (Hydraulic or Scissor)

Standard Jack Stands

Japanese cars use the following metric sizes:

10mm, 12mm, 14mm, 17mm, 19mm, 21mm, 22mm

Needed Parts

Replacement Timing Belt

Timing Belt Cover Gasket (Optional)

Engine Control Rod – “Dog Bone” (Optional)

Belt Tensioner Idler Pulley (Optional)

Belt Guide Idler Pulley (Optional)

Accessory Belts and Crankshaft Pulley Removal

  • Place transmission in Park, apply the parking brake and chock the rear wheels.
  • Support the vehicle on a jack stands and remove the passenger side front wheel.
  • Unbolt the Front Fender Apron Seal – passenger side.
  • Unbolt the Crankshaft Pulley Bolt. Use a breaker bar secured to the ground or frame of the car if an impact driver is not available. “Thump” the ignition around 1 second. The tension on the bolt should be relieved as a result of the torque from the starter motor. If that doesn’t work, applying heat to the bolt from a propane torch can help … but be careful … the oil seal can be damaged from too much heat. If the car has a weak battery, not enough amperage is available for the the starter motor to unbolt the pulley bolt. Additional amps can be had by jumping another battery from another car. As a last resort, find a friendly garage owner who’ll torque the bolt off for you with their 180lbs air powered impact driver.
  • Turn the engine clockwise to align the crankshaft pulley to the Top-Dead-Center (TDC) mark on the timing belt cover. Use a 1/2 drive socket wrench attached to the pulley bolt to ease engine rotation. Use a impact driver or do a quick twist of the socket wrench counter clockwise to spin off the crankshaft pulley without upsetting the alignment.
  • Unbolt the crankshaft pulley.
  • (Supplemental) – if your Power Steering Fluid has turned black, the fluid can be replaced with the timing belt replacement job. More fluid can be drained in lieu of draining from the reservoir. Remove the hose clamp and hose from the metal tube located below the crankshaft pulley. The majority of the fluid can be ‘pushed’ out by rotating the steering wheel to the left and right while the fluid is draining out. When completely drained, reconnect the hose and clamp.
  • Loosen or remove the Power Steering Pump Bracket Bolt.
  • With either a long metal or crow bar, apply pressure to the left side of the pump to relieve tension on the Power Steering Belt. Alternatively, a few light taps with a hammer on the power steering pump bracket behind the ps bracket will move the pump forward of the bolt and relieve tension on the belt.
  • Loosen the tension on the Alternator Adjustment Locking Bolt.
  • Relieve tension on the Alternator Pivot Bolt.
  • Turn the Alternator Belt Adjustment Bolt counter clockwise until the alternator belt can be removed by pushing down on the alternator.
  • Remove both the Alternator and Power Steering Pump Belts.


Timing Belt Cover and Side Engine Mount Removal

  • Disconnect the Coolant Reservoir Hose from the Reservoir container.
  • Disconnect the two engine ground wire connectors.
  • Unbolt and remove the side engine mount.
  • Remove the alternator bracket nut and bracket.
  • Optional – Detach and move the power steering hose to the firewall.
  • Unbolt and remove the lower timing belt cover.
  • Unbolt and remove the upper timing belt cover.
  • Unbolt and remove the side engine mount. Keep the one side engine mount long bolt in place while removing the mount.
  • Remove the timing belt guide.

Timing Belt Removal

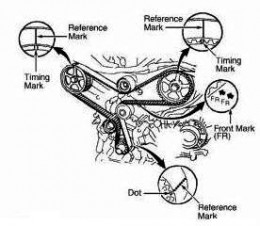
  • Check that the camshaft alignment marks match the backing plate alignment marks. If not aligned, screw back in the crankshaft bolt and rotate the engine with a wrench until alignment is made.
  • Optional – When alignment has been made, apply paint marks to the camshaft, crankshaft, backing plate alignment marks along with the timing belt. These will help with re-alignment problems if the crankshaft or camshafts were to move during belt installation.
  • Unbolt the timing belt tensioner.
  • Simultaneously twist the timing belt between the right camshaft and crankshaft -and- the right camshaft and left camshaft approximately 45 degrees. This will slightly move both camshafts clockwise to ease belt removal as well as new belt installation. A small amount of slack will now exist between both camshafts and the right camshaft with the crankshaft.
  • Remove the old timing belt.


Addendum – Water Pump / Guide Pulley & Tensioner Pulley Replacement

If replacement of the Water Pump is desired with the belt replacement, a 10mm stud removal tool will be needed. This tool will ease removal of the pump’s mounting stud thereby allowing the pump to clear the Camshaft Side Timing Belt cover. If this stud is not removed, there will not be enough clearance for the pump to be moved away from the Camshaft Side Timing Belt Cover. Some people will remove the Camshaft sprockets and then the belt cover before removing the pump … extra work and unnecessary if the pump mounting stud is removed.

From my experience, the Camry’s Aisin Water Pumps are good for at least 200,000 miles. Never encountered one go bad at or around 100k miles.

If you purchased a Timing Belt Component Kit, your kit should include a new Timing Belt Guide Pulley (the pulley between the two camshaft sprockets) and Tension Pulley (between the crankshaft and left camshaft). The Guide Pulley can be easily replaced by unbolting the old and bolting on the new. The Tension Pulley is slightly more difficult. This pulley is part of an assembly that allows the pulley to dynamically apply continuous pressure on the timing belt (via the tensioner) if any belt stretch were to occur. The tensioner mounting bolt runs through a sleeve that allows the pulley to moves approximately 30 degrees to take up belt slack.

New Timing Belt Installation

  • Start by installing the new belt on the right camshaft using the paint line on the new belt. Prevent the belt from slipping off by using a spring loaded plastic alligator clip.
  • Stretch the belt and slip the belt onto the left camshaft. Again, use the paint line on the new belt for alignment and use a plastic alligator clip to prevent the belt from slipping off.
  • Guide the right side of the belt over the water pump and then position the belt on the crankshaft pulley cogs. There should be little to no slack when this is done. If so, the belt may be loose by one cog.
  • While holding the belt in place over the crankshaft pulley with the right hand, use the left hand to slip the left side of the belt over the tensioner pulley.
  • Bolt on the timing belt tensioner. Applying equal turns on each bolt will gradually compress the tensioner pin against the tensioner pulley assembly. As this occurs, the timing belt will tighten up.
  • Optional – At this point the car can be started to check for belt alignment. If the car misfires or the Check Engine light were to come on, turn off the car, connect the crankshaft pulley bolt and rotate the engine with a ratchet wrench to the alignment marks. Being off by one cog will cause an engine misfire. This is usually between the right camshaft and the crankshaft.
  • Reverse the outlined instructions to reconnect removed components as outlined in the last thumbnail photo in this article. The Crankshaft Pulley Bolt can be ‘shocked’ torqued on with a Mechanical Impact Driver if either an air or electrically powered impact driver is not available. This tool may be available for rent at a auto retailer; otherwise, you can always bring your car to a private garage to have them torque the bolt on for you. Usually they’ll do it for free out of professional courtesy.
  • If the power steering fluid was drained, pour in new fluid and turn the steering wheel right to left to create suction. The fluid level should drop, add more fluid and repeat procedure until the fluid level has stabilized.

Timing Belt Problems – How to Solve Them

Are you facing timing belt problems? Well, this is a rather serious matter because your engine is largely dependent on the smooth running of the timing belt. The timing belt connects the crankshaft, the walls, the camshaft and the Pistons all together. So if one is “out of caliber” there is a chance that you might find yourself having an engine seizing at odd moments. That is because the synchronization which is timed to run in a very well coordinated motion has been disturbed. That is why you need to know all about timing belt problems and how they need to be solved immediately so that your engine does not break down right in the middle of the road.

One of the most common of timing belt problems is not replacing it in time. Your timing belt is going to face the normal wear and tear of any hard worked car component and is going to give way during the passage of time. So it is necessary to get the professionals are expert or mechanic to check out your timing belt problems and replace them whenever necessary. He is going to replace any damaged, cracked or badly worn timing belt.

Replace Your Timing Chain

What you will need:

1. Combination Wrenches
2. A Socket Set
3. Torque Wrench
3. A Harmonic Balancer Puller
5. A Three-jaw Gear Puller
6. Screwdrivers
7. Hammer and Punch
8. Gasket Scraper
9. Timing Light
10. Tube of Silicone Sealer
11. Timing Chain Cover Gasket Set
12. New Timing Chain and Gears
13. Drain Pan
14. Antifreeze
15. Jack
16. Jack stands

Before You Start:

Follow these instructions carefully. Read and be sure you understand them before you begin.
Gather together all of your tools and supplies before you begin.
Allow plenty of time to do the job so you don’t have to hurry.
Remember that these are general instructions. For more detailed instructions pertaining to your specific vehicle, consult an appropriate repair manual.
Safety is important whenever you’re working around machinery. Beware of hot objects, sharp instruments and hazardous materials.
Don’t substitute tools unless you’re sure you won’t compromise either your safety or the performance of your vehicle.
Never work on a vehicle that is only supported by a jack. Use jack stands to support the vehicle while you work. Work on a solid, level surface. Never jack a car up on dirt or grass.
Why Replace Your Timing Chain?

Over time, wear on internal working parts of your engine will spell the need for replacement. One of the internal working parts that wear is the timing chain and timing sprockets. The timing chain and sprockets are the connecting line between the crankshaft and the camshaft. As the crankshaft turns, via the timing chain, it drives the camshaft that operates the engine’s valves via the lifters, push rods and rocker arm assemblies The timing of the valves opening and closing at precise intervals is crucial for proper engine operation. As the timing chain and sprockets wear, this precise timing of the valves gradually changes, eventually to a point where replacement is necessary.

Telltale signs of worn out timing chains are:

Rough idle.
Sluggish performance and poor economy.
Sudden engine performance change including the inability to start the engine.
Intermittent backfire through the intake manifold.
Inconsistent ignition timing or a clattering noise coming from the front of the engine.
Before starting the disassembly procedures, I would suggest cleaning the engine with an engine degreaser. A clean engine is easier to work on and helps prevent dirt or contamination from entering the engine during disassembly.