Toyota Camry 5SFE Engine Timing Belt, Water Pump & Seal Replacement

Introduction

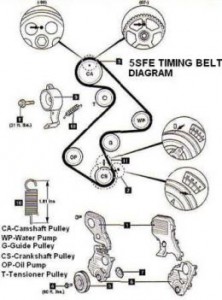
The Toyota 5SFE motor is a 4 cylinder 2.2 liter timing belt driven double overhead cam engine design. This motor is commonly found in the Camry, Celica, MR2 and RAV4 from 1990 to 2001. The engine is a Non-Interference type meaning damage to either the valves or pistons is unlikely to occur if the belt were to ever brake during vehicle operation. The outlined instructions can therefore be used on belts that have broken. Positioning the Camshaft Sprocket and the Crankshaft Pulley for Top-Dead-Center (TDC) alignment is all that is needed for broken belt replacement.

timing belt diagramExpect to spend approximately 3 hours for just a belt replacement. Replacement of the water pump (approximately 1/2 hour) and sprocket seals (approximately 1/2 or less per seal) can vary.

The belt replacement interval for the 5SFE engine is either 60,000 or 90,000 miles based on the year of vehicle manufacture. Perhaps the introduction of Highly Saturated Nitrile (HSN) Timing Belts adopted for used on Toyota vehicles raised the service interval. Also the time since last replacement should be considered as well. Belt replacement every 6 to 7 years is recommended if under the mileage threshold.

It is recommended that the two Idler Pulleys (one for belt tension and the other as a belt guide) be replaced with every belt change. If the bearings in any of the pulleys were to lose its lubricating properties, the pulley can either wobble placing undue stress on the timing belt or potentially seize guaranteeing belt failure. Worn bearings can be noticed by a pitched grinding noise during engine warm up. When whatever grease remaining inside the bearing lubricates the bearings through engine heat, the noise will disappear. This can be considered a warning to have the belt and bearings replaced as soon as feasible.

Although many dealerships and private service stations recommend Water Pump replacement with the Timing Belt, based on personal experience, the AISIN Water Pumps in Toyotas are very durable. If the coolant has been changed per manufacturer’s recommended interval, and no hard mineral water used, the pump seals and bearings should last over 150,000 miles. This is based on personal experience with many 5SFE belt replacements jobs. However, the pump can be examined for wear and leakage after the Timing Belt Cover has been removed with the Timing Belt. Look for leakage from the weep hole, any chirping noise from the pump when the engine is running and any drag on the pulley when turned by hand after the timing belt has been removed.

On 5SFE engines with over 100,000 miles, there is a good possibility of oil seal wear for the Camshaft, Crankshaft and Oil Pump. The seals are inexpensive but can be time consuming to replace. If the leakage is very bad, oil will get on your Timing Belt which may cause pre-mature belt failure. Moreover, check the Side Engine Control Rod (commonly referred to as the Dog Bone) along with the front engine mount which dampens the the forward and backward flexing of the engine. The rubber vibration dampener has a tendency to dry rot and crack with age. A simple test is to ‘blip’ the engine with the transmission in gear while having your foot on the brakes. If the engine lifts up and settles back down, a new front mount may be in order. Replacement is simple and straightforward. Otherwise, the exhaust system’s flex pipe may eventually crack leading to expensive repairs.

The cost of the belt and components can vary. For Japanese OEM parts: Mitsuboshi Timing Belt, Koyo Pulleys and Aisin Water Pump. Shop and compare prices including shipping costs for the best deals. The belt manufacturers Gates and Dayco, OEM suppliers for Car companies like Honda, are very good and their belts can be had for approximately $15. A Timing Belt Component Kit (Belt, Idle Pulley & Tensioner Pulley) around $50. Water Pumps … around $30, Oil Seals … around $5 each. The parts that comprise a Timing Belt Component Kit for the 5SFE is interchangeable with the following Toyota vehicles:

CELICA (1999)

CELICA GT (1987 – 1998)

CELICA GTS (1990 – 1992)

CELICA GTS SPORT (1990 – 1993)

CELICA ST (1987 – 1989)

MR2 (1991 – 1995)

RAV4 (1996 – 2000)

SOLARA (1999 – 2001)

When To Replace Your Timing Belt

Timing belt replacement is the “must-do” service operation which every car owner should know about. Along with that knowledge, we should be aware of whether our engine is considered an interference engine or not. These two bits of information can, at a minimum, save us from unexpected breakdown and in the extreme can help us avoid thousands of dollars in repairs.
Without getting too technical, the synchronization between two internal engine parts (the crank and cam shafts) is accomplished with the help of the timing belt. In the process of these two parts moving the valves open and close in close proximity to the pistons. This constitutes an interference engine, because if the timing belt jumps a tooth on the sprocket on which it rides or the belt fails altogether the valves and pistons will “interfere” with each other.

This collision will cause major damage to the engine. The repair bill will, on older vehicles, often exceed the value of the car. On the other hand, a car whose engine is not configured this way will simply lose power or will not start. While this might be more desirable than facing huge repair costs, it is something that is better avoided if possible.

The motivation for preemptive replacement of the timing belt is obvious. But how do you know when to replace it? There is always the owner’s manual which will indicate mileage of anywhere from 50,000 to 90,000 miles. For a comprehensive list of timing belt service intervals and the type of engine (interference or not) check out About.com.

Some other considerations relative to timing belt replacement are:

1) Is the vehicle leaking any type of fluid that might degrade the belt, if so disregard the suggested replacement interval and replace the belt ASAP as well as repair the leak;

2) Do you know the repair history of the vehicle if it is not verifiable err on the side of safety and replace the belt;

3) Timing belt replacement can be labor intensive. Since the water pump is usually accessed in the same operation you might consider replacing the pump at the same time even if it doesn’t leak. You will save on labor and possibly prevent a pump replacement later on that will also necessitate the belt to be replaced again;

4) To avoid subsequent failure consider replacing sprockets and tensioners that are part of the timing belt system. All components are sometimes sold as a kit and can be less expensive than purchasing them individually.

All service intervals should be followed in order to protect your investment and maintain the integrity of your warranty. In the case of the timing belt, it just makes sense.

Diagram for timing marks for crank shaft and oil pump for 2004 hyundai sonata

Optional Information:
Year: 2004
Make: Hyundai
Model: sonata
Engine: 2.4

hyundai timing belt

Be aware the oil pump pulley drives a balance shaft, and due to the gear reduction in the oil pump the timing mark is only correct once every 720 degrees. Meaning if the oil pump sprocket has spun with the belt off the vehicle and you realign it to the timing mark you have a one in two chance of it being correct. To verify you have the correct position, there is a 14mm bolt in the left hand side of the block (right on the balance shaft ‘tunnel’. When this bolt is removed, you will be able to stick a screwdriver or othr metal object 2.5 inches into the block when it is in the correct position; the shaft also will not turn more than 15 degrees in either direction. When you are out of phase, you will only be able to go in about one inch.

Replacing Your Car’s Timing Belt

Knowing When To Change A Timing Belt

Changing a timing belt on your vehicle can be a very time consuming. This is due to the fact that there are a lot of components under your hood that must be removed before you can even get to your vehicle’s timing belt. This is why it is best to change a timing belt at the same time that you are planning on doing other repairs and maintenance practices to your vehicle such as putting on a replacement water pump or changing belts like the serpentine, air conditioner or water pump belt.
Timing belts tend to begin breaking down at around 60,000 miles. You will notice the power to your vehicle begin to slow down, the fuel efficiency of your vehicle can be affected as well as your vehicle showing signs of working harder.
How To Change A Timing Belt or Timing Chain
Different vehicles have different patterns for changing a timing belt or timing chain. The best thing to do when you want to change the timing belt is to look over your owner’s manual that is specific for your make and model vehicle. You can also purchase an automobile repair manual that is designed specifically for the needs of your automobile at any automotive repair shop in your local area.
The basics to changing a timing belt on the vehicle however are pretty much uniform. The steps to do this are as follows:
Step 1. Before you can replace the timing belt on any vehicle it is a good idea to let the vehicle sit overnight so that the engine is completely cool and there is a reduced chance of experiencing serious burns from the engine.
Step 2. As it is with most vehicle repairs you must first disconnect any power supply to the vehicle. This means that the battery cables must be removed from the battery terminal and tied back so that there is no risk of them touching the posts or other parts of the vehicle while working.
Step 3. Place blocks in front and behind the wheels of your vehicle so that there is not chance of the vehicle rolling and accidentally causing injuries to you or others who may be around.
You will now need to remove any obstructions that may be in the way of getting to your timing belt. This includes:
Step 4. Make sure that the air intake assembly to your vehicle is completely removed.
Step 5. Locate the pulley that powers the supply to your water pump if this is in the way on your vehicle. You will need to loosen the bolt holding this pulley in place.
Step 6. For some vehicles it may be necessary to do the same for other equipment such as the power steering pump. This will require you to loosen the bolt and remove the belt that is around the pulley. You can then unbolt the power steering pump and move it out of your way.
Step 7. Line up the mark on your crankshaft pulley to the O that is on the timing scale with a large wrench. You can find the timing scale molded on your vehicle engine block.
Step 8. Using the right sized socket you will have to removed the bolts that are holding the timing belt cover on. When you have the bolts removed you can then pull off the timing belt cover.
Step 9. Inspect the timing belt tensioned bearings for any looseness or noise. If these problems exist you will need to replace the timing belt tensioned bearings as well.
Step 10. Locate your camshaft and check to makes sure there are no leaks in the crankshaft or camshaft seals. If you do notice leaking this could be an early sign that there will be premature failure for your new timing belt. It is best to replace these seals now instead of waiting for bigger problems and the chance of having to do all of this work again.
Step 11. For most vehicle makes and models you should now be able to locate the timing belt. Make sure that all timing marks on your belt are properly lined up. Loosen the timing belt tensioned and you will then be able to remove the timing belt very easily. Make sure that the camshaft and crankshaft for your vehicle’s engine are secured and that they do not move while your timing belt is off of your vehicle.
Step 12. Place your new timing belt on the same way that you removed it. Make any tension adjustments to the timing belt as necessary. Inspect the new belt to make sure that it is fitting over the teeth for the timing sprockets correctly. Makes sure that you do not over tighten the belt.
Step 13. When replacing the timing belt cover install a new gasket to seal the cover correctly. Do not use an old gasket as this will not seal properly.
Step 14. If you had to remove any pumps at the beginning of this project you will now have to hook them back up again. This includes the water pump, power steering pump as well as any other accessories that may have gotten in the way at the beginning of this project.
Step 15. Visually inspect all timing marks to make sure that they are still aligned correctly.
Step 16. Reinstall your vehicle’s air intake assembly that was removed in the beginning.
Step 17. Reconnect your vehicle’s battery. Make sure that there is no corrosion around the posts or the battery cables while you are at this step.
Step 18. Turn on your vehicle and look for any problem areas such as leaks that there may be prior to driving your vehicle. Do not hesitate or postpone any repairs that may be needed.