How to Prevent Cold-Weather Stalls: Winterizing your Battery

Hunting season is fast approaching, and that means it is time to at least start THINKING about winterizing your vehicle. Have you ever jumped inside your car to head to work in the morning to find your car will not start? It’s happened to the best of us, but there are a few simple things you can do to help prevent this scenario from happening to you this winter.

Something to keep in mind is that our car’s battery loses about a third of its starting power when the temps dip down into the 30’s. In addition, our driving habits in the winter make it less likely the alternator will be able to fully recharge our car battery as we drive. For example, we tend to drive less often and we drive shorter distances in the winter, we constantly run the defrost and we are using our headlights more than in the warmer months – all putting a larger load on the alternator.

So what can you do?

1) Take a Peek Under the Hood: Have your battery checked before winter hits to make sure your terminals are tight and your battery is not corroded. (Stop in at Cars For Keeps & We’ll do it FREE!)

2) Turn “Stuff” Off: Turn off your blowers and accessories when you turn off your car so there isn’t as large of a load on your battery when you go to start your vehicle again. Turn your headlights on after you start your vehicle, NOT before.

3) Park Inside: Park your vehicle in a garage if you have one. This will help keep the battery somewhat warmer.

4) Pay Attention to Your Headlights: Do they dim and brighten on occasion? If so, stop by Cars4Keeps and one of our technicians can test your alternator for you.

5) Listen to Your Vehicle Start: Do you notice your car is having trouble turning over (starting), but once it is running everything seems normal? This may indicate that your battery has a low charge, weak connection or strater getting ready to leave you walking.

The last thing any of us need this winter is to be stranded somewhere with flakes swirling around us and a car that refuses to start. Be proactive and take winterizing your vehicle seriously this year. While there is more to it than batteries and alternators, a quick stop into Cars4Keeps is all you need to get your car in top winter condition.
When To Replace Your Timing Belt

Timing belt replacement is the “must-do” service operation which every car owner should know about. Along with that knowledge, we should be aware of whether our engine is considered an interference engine or not. These two bits of information can, at a minimum, save us from unexpected breakdown and in the extreme can help us avoid thousands of dollars in repairs.
Without getting too technical, the synchronization between two internal engine parts (the crank and cam shafts) is accomplished with the help of the timing belt. In the process of these two parts moving the valves open and close in close proximity to the pistons. This constitutes an interference engine, because if the timing belt jumps a tooth on the sprocket on which it rides or the belt fails altogether the valves and pistons will “interfere” with each other.

This collision will cause major damage to the engine. The repair bill will, on older vehicles, often exceed the value of the car. On the other hand, a car whose engine is not configured this way will simply lose power or will not start. While this might be more desirable than facing huge repair costs, it is something that is better avoided if possible.

The motivation for preemptive replacement of the timing belt is obvious. But how do you know when to replace it? There is always the owner’s manual which will indicate mileage of anywhere from 50,000 to 90,000 miles. For a comprehensive list of timing belt service intervals and the type of engine (interference or not) check out About.com.

Some other considerations relative to timing belt replacement are:

1) Is the vehicle leaking any type of fluid that might degrade the belt, if so disregard the suggested replacement interval and replace the belt ASAP as well as repair the leak;

2) Do you know the repair history of the vehicle if it is not verifiable err on the side of safety and replace the belt;

3) Timing belt replacement can be labor intensive. Since the water pump is usually accessed in the same operation you might consider replacing the pump at the same time even if it doesn’t leak. You will save on labor and possibly prevent a pump replacement later on that will also necessitate the belt to be replaced again;

4) To avoid subsequent failure consider replacing sprockets and tensioners that are part of the timing belt system. All components are sometimes sold as a kit and can be less expensive than purchasing them individually.

All service intervals should be followed in order to protect your investment and maintain the integrity of your warranty. In the case of the timing belt, it just makes sense.

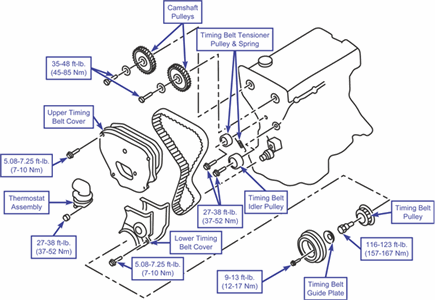
99 kia sporage timing marks

kia timing marks
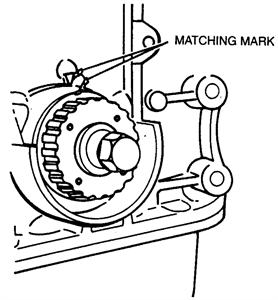
Crankshaft match marks

Align marks on timing belt pulley and pump body.

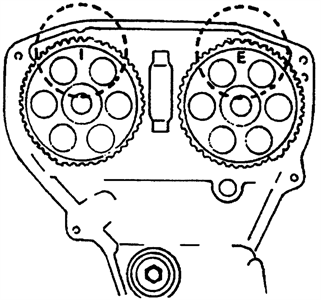
Camshaft pulley alignment marks

1. Align marks on camshaft pulleys with alignment marks on seal plate.
2. Install timing belt. NOTE: No looseness should exist on the tension side and at the camshaft pulleys.
3. Loosen tensioner lock bolt.
4. Turn crankshaft 2 revolutions in direction of rotation and check that timing marks are still in alignment.
5. Tighten timing belt tension lock bolt to 27-38 ft lb (32-52 Nm).
6. Apply a force of 22 lbs to timing belt between camshaft sprockets.
7. Belt deflection should measure 0.30-0.33 in (7.5-8.5 mm)

NOTE: Replace tensioner spring if timing belt deflection is excessive.
Timing Belt Installation

kia timing belt

1. Install lower timing belt cover.
2. Install upper timing belt cover.
3. Install power steering drive belt and adjust belt tension.
4. Install fan pulley.
5. Install generator drive belt and adjust belt tension.
6. Install A/C drive belt and adjust belt tension.
7. Install splash guard.
8. Install fan and fan shroud.
9. Install 4 fan bolts. Tighten to 24 ft lb (33 Nm).
10. Install fan shroud mounting bolts.
11. Install fresh air duct.
12. Connect hose to resonance chamber.
13. Connect battery negative cable.

Replacing Your Car’s Timing Belt

Knowing When To Change A Timing Belt

Changing a timing belt on your vehicle can be a very time consuming. This is due to the fact that there are a lot of components under your hood that must be removed before you can even get to your vehicle’s timing belt. This is why it is best to change a timing belt at the same time that you are planning on doing other repairs and maintenance practices to your vehicle such as putting on a replacement water pump or changing belts like the serpentine, air conditioner or water pump belt.
Timing belts tend to begin breaking down at around 60,000 miles. You will notice the power to your vehicle begin to slow down, the fuel efficiency of your vehicle can be affected as well as your vehicle showing signs of working harder.
How To Change A Timing Belt or Timing Chain
Different vehicles have different patterns for changing a timing belt or timing chain. The best thing to do when you want to change the timing belt is to look over your owner’s manual that is specific for your make and model vehicle. You can also purchase an automobile repair manual that is designed specifically for the needs of your automobile at any automotive repair shop in your local area.
The basics to changing a timing belt on the vehicle however are pretty much uniform. The steps to do this are as follows:
Step 1. Before you can replace the timing belt on any vehicle it is a good idea to let the vehicle sit overnight so that the engine is completely cool and there is a reduced chance of experiencing serious burns from the engine.
Step 2. As it is with most vehicle repairs you must first disconnect any power supply to the vehicle. This means that the battery cables must be removed from the battery terminal and tied back so that there is no risk of them touching the posts or other parts of the vehicle while working.
Step 3. Place blocks in front and behind the wheels of your vehicle so that there is not chance of the vehicle rolling and accidentally causing injuries to you or others who may be around.
You will now need to remove any obstructions that may be in the way of getting to your timing belt. This includes:
Step 4. Make sure that the air intake assembly to your vehicle is completely removed.
Step 5. Locate the pulley that powers the supply to your water pump if this is in the way on your vehicle. You will need to loosen the bolt holding this pulley in place.
Step 6. For some vehicles it may be necessary to do the same for other equipment such as the power steering pump. This will require you to loosen the bolt and remove the belt that is around the pulley. You can then unbolt the power steering pump and move it out of your way.
Step 7. Line up the mark on your crankshaft pulley to the O that is on the timing scale with a large wrench. You can find the timing scale molded on your vehicle engine block.
Step 8. Using the right sized socket you will have to removed the bolts that are holding the timing belt cover on. When you have the bolts removed you can then pull off the timing belt cover.
Step 9. Inspect the timing belt tensioned bearings for any looseness or noise. If these problems exist you will need to replace the timing belt tensioned bearings as well.
Step 10. Locate your camshaft and check to makes sure there are no leaks in the crankshaft or camshaft seals. If you do notice leaking this could be an early sign that there will be premature failure for your new timing belt. It is best to replace these seals now instead of waiting for bigger problems and the chance of having to do all of this work again.
Step 11. For most vehicle makes and models you should now be able to locate the timing belt. Make sure that all timing marks on your belt are properly lined up. Loosen the timing belt tensioned and you will then be able to remove the timing belt very easily. Make sure that the camshaft and crankshaft for your vehicle’s engine are secured and that they do not move while your timing belt is off of your vehicle.
Step 12. Place your new timing belt on the same way that you removed it. Make any tension adjustments to the timing belt as necessary. Inspect the new belt to make sure that it is fitting over the teeth for the timing sprockets correctly. Makes sure that you do not over tighten the belt.
Step 13. When replacing the timing belt cover install a new gasket to seal the cover correctly. Do not use an old gasket as this will not seal properly.
Step 14. If you had to remove any pumps at the beginning of this project you will now have to hook them back up again. This includes the water pump, power steering pump as well as any other accessories that may have gotten in the way at the beginning of this project.
Step 15. Visually inspect all timing marks to make sure that they are still aligned correctly.
Step 16. Reinstall your vehicle’s air intake assembly that was removed in the beginning.
Step 17. Reconnect your vehicle’s battery. Make sure that there is no corrosion around the posts or the battery cables while you are at this step.
Step 18. Turn on your vehicle and look for any problem areas such as leaks that there may be prior to driving your vehicle. Do not hesitate or postpone any repairs that may be needed.

Differen types of car engines

Engine to a car is like a heart to a human person. It functions by the principle of combustion or burning the fuel. There are different methods of classifying car engines. This classification is usually done according to the number of cylinders, the type of fuel used, and the arrangement of cylinders.
Type of fuel used
A car engine may either use petrol (gasoline) or diesel. Petrol engines use spark plugs for ignition. Diesel engines on the other hand use compression for ignition. The diesel engine is quite heavier than the gasoline engine. The gasoline (petroleum) engines are more common than diesel engines.
Number of cylinders
A car engine can have from three to twelve cylinders. The number of cylinders affects the power of the car. An eight-cylinder engine would be more powerful than a four-cylinder engine, though it would also consume a lot more fuel.
Arrangement of cylinders
In a car engine, you will find the cylinders are usually arranged in one of two ways. The cylinders could be inclined in a “V” shape or in a straight row. In that case, V-8 engine is an engine with eight cylinders inclined in a V shape. The earliest form of engine was known as the rotary cylinder engine. The cylinders in a rotary engine are arranged in a round manner with the crankshaft surrounded by a revolving block of cylinders. However, the rotary engines are quite rare today.
Other classifications
Engines may also be classified as to how they cool. A car may either use liquid coolant or air coolant. A car engine may also be classified according to the number of strokes, that is, four stroke, eight stroke and so on. Final thing to add here is that car engines can also have either a timing chain or a timing belt. Timing belt serves to regulate the timing of the valves of the engine. Timing chains may last longer than timing belts as they do not stretch and wear out due to tension.