How To Timing Belt Replacement – Camry / Avalon / ES 300 / Sienna / RX 300 / Solara – V6 – MZFE

Introduction

The Toyota MZFE engine is either a 3.0 or 3.3 liter transversely mounted, timing belt driven, 24 valve dual single overhead cam aluminum V6 design. This engine has been developed for use in many Toyota vehicles from 1994 to 2003. These include the Lexus ES300, RX300, and the ToyotHow To Timing Belt Replacement - Camry 
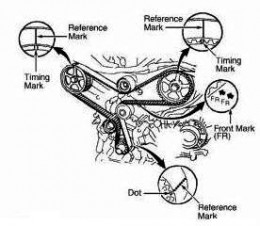
a Camry, Avalon and Solara. The 3.3 liter version was introduced as the 3MZFE. Most engine components in the 1MZFE are interchangeable with the 3MZFE including the timing belt, tensioner pulley and guide pulley. However, the 3MZFE has a different automatic belt tensioner configuration which is not covered in this article. Up until the introduction of VVTI (Variable Valve Timing) technology, the engine’s valve train were Non-Interference. This means that damage to either the valves or pistons will not occur if the timing belt were to brake during vehicle operation. The outlined timing belt replacement instructions can therefore be used on belts that have broken on non VVTI engines. Positioning the Camshaft Sprockets and the Crankshaft Pulley alignment marks to Top-Dead-Center (TDC) is all that is needed before the new belt is installed. A compression leakage test can be performed after belt installation to verify the integrity of the valves.

Toyota recommends belt replacement at or over 90,000 miles. Of the MZFE engines that were worked on, all cars under 200,000 miles had good operating water pumps. Over 150,000 miles, some of the guide and tensioner pulleys were indicating signs of wear and needed replacement.

Allocate 3 or more hours for just a belt replacement. Paint marks on the belt where it meets the crankshaft and camshaft pulleys will eliminate a lot of grief if any of these pulleys were to move after belt removal and during new belt installation.

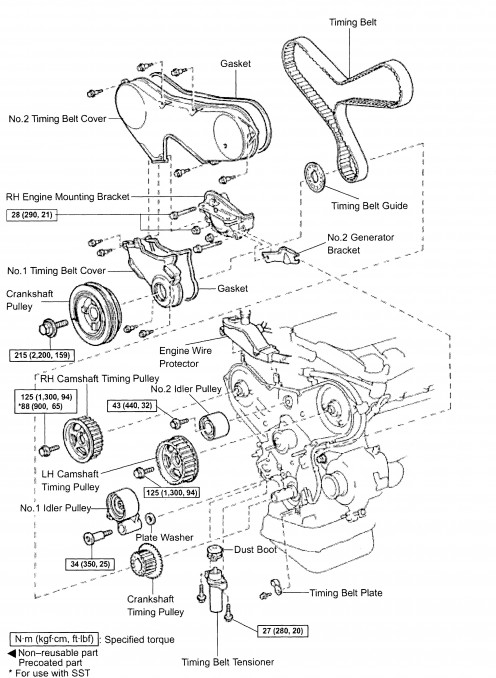
1MZFE Timing Belt Components

4306044_f496

Tools and Parts Needed

Tools

Impact Driver (Electric, Compressed Air, or Mechanical)

1/2″ Breaker Bar (if no Impact Driver available used for Crankshaft Pulley Bolt removal)

1/2″ & 3/8″ drive Socket Wrenches

Metric Box Wrenches & Sockets

1/2″ & 3/8″ Wrench Extensions

Screw Drivers

Jack (Hydraulic or Scissor)

Standard Jack Stands

Japanese cars use the following metric sizes:

10mm, 12mm, 14mm, 17mm, 19mm, 21mm, 22mm

Needed Parts

Replacement Timing Belt

Timing Belt Cover Gasket (Optional)

Engine Control Rod – “Dog Bone” (Optional)

Belt Tensioner Idler Pulley (Optional)

Belt Guide Idler Pulley (Optional)

Accessory Belts and Crankshaft Pulley Removal

  • Place transmission in Park, apply the parking brake and chock the rear wheels.
  • Support the vehicle on a jack stands and remove the passenger side front wheel.
  • Unbolt the Front Fender Apron Seal – passenger side.
  • Unbolt the Crankshaft Pulley Bolt. Use a breaker bar secured to the ground or frame of the car if an impact driver is not available. “Thump” the ignition around 1 second. The tension on the bolt should be relieved as a result of the torque from the starter motor. If that doesn’t work, applying heat to the bolt from a propane torch can help … but be careful … the oil seal can be damaged from too much heat. If the car has a weak battery, not enough amperage is available for the the starter motor to unbolt the pulley bolt. Additional amps can be had by jumping another battery from another car. As a last resort, find a friendly garage owner who’ll torque the bolt off for you with their 180lbs air powered impact driver.
  • Turn the engine clockwise to align the crankshaft pulley to the Top-Dead-Center (TDC) mark on the timing belt cover. Use a 1/2 drive socket wrench attached to the pulley bolt to ease engine rotation. Use a impact driver or do a quick twist of the socket wrench counter clockwise to spin off the crankshaft pulley without upsetting the alignment.
  • Unbolt the crankshaft pulley.
  • (Supplemental) – if your Power Steering Fluid has turned black, the fluid can be replaced with the timing belt replacement job. More fluid can be drained in lieu of draining from the reservoir. Remove the hose clamp and hose from the metal tube located below the crankshaft pulley. The majority of the fluid can be ‘pushed’ out by rotating the steering wheel to the left and right while the fluid is draining out. When completely drained, reconnect the hose and clamp.
  • Loosen or remove the Power Steering Pump Bracket Bolt.
  • With either a long metal or crow bar, apply pressure to the left side of the pump to relieve tension on the Power Steering Belt. Alternatively, a few light taps with a hammer on the power steering pump bracket behind the ps bracket will move the pump forward of the bolt and relieve tension on the belt.
  • Loosen the tension on the Alternator Adjustment Locking Bolt.
  • Relieve tension on the Alternator Pivot Bolt.
  • Turn the Alternator Belt Adjustment Bolt counter clockwise until the alternator belt can be removed by pushing down on the alternator.
  • Remove both the Alternator and Power Steering Pump Belts.


Timing Belt Cover and Side Engine Mount Removal

  • Disconnect the Coolant Reservoir Hose from the Reservoir container.
  • Disconnect the two engine ground wire connectors.
  • Unbolt and remove the side engine mount.
  • Remove the alternator bracket nut and bracket.
  • Optional – Detach and move the power steering hose to the firewall.
  • Unbolt and remove the lower timing belt cover.
  • Unbolt and remove the upper timing belt cover.
  • Unbolt and remove the side engine mount. Keep the one side engine mount long bolt in place while removing the mount.
  • Remove the timing belt guide.

Timing Belt Removal

  • Check that the camshaft alignment marks match the backing plate alignment marks. If not aligned, screw back in the crankshaft bolt and rotate the engine with a wrench until alignment is made.
  • Optional – When alignment has been made, apply paint marks to the camshaft, crankshaft, backing plate alignment marks along with the timing belt. These will help with re-alignment problems if the crankshaft or camshafts were to move during belt installation.
  • Unbolt the timing belt tensioner.
  • Simultaneously twist the timing belt between the right camshaft and crankshaft -and- the right camshaft and left camshaft approximately 45 degrees. This will slightly move both camshafts clockwise to ease belt removal as well as new belt installation. A small amount of slack will now exist between both camshafts and the right camshaft with the crankshaft.
  • Remove the old timing belt.


Addendum – Water Pump / Guide Pulley & Tensioner Pulley Replacement

If replacement of the Water Pump is desired with the belt replacement, a 10mm stud removal tool will be needed. This tool will ease removal of the pump’s mounting stud thereby allowing the pump to clear the Camshaft Side Timing Belt cover. If this stud is not removed, there will not be enough clearance for the pump to be moved away from the Camshaft Side Timing Belt Cover. Some people will remove the Camshaft sprockets and then the belt cover before removing the pump … extra work and unnecessary if the pump mounting stud is removed.

From my experience, the Camry’s Aisin Water Pumps are good for at least 200,000 miles. Never encountered one go bad at or around 100k miles.

If you purchased a Timing Belt Component Kit, your kit should include a new Timing Belt Guide Pulley (the pulley between the two camshaft sprockets) and Tension Pulley (between the crankshaft and left camshaft). The Guide Pulley can be easily replaced by unbolting the old and bolting on the new. The Tension Pulley is slightly more difficult. This pulley is part of an assembly that allows the pulley to dynamically apply continuous pressure on the timing belt (via the tensioner) if any belt stretch were to occur. The tensioner mounting bolt runs through a sleeve that allows the pulley to moves approximately 30 degrees to take up belt slack.

New Timing Belt Installation

  • Start by installing the new belt on the right camshaft using the paint line on the new belt. Prevent the belt from slipping off by using a spring loaded plastic alligator clip.
  • Stretch the belt and slip the belt onto the left camshaft. Again, use the paint line on the new belt for alignment and use a plastic alligator clip to prevent the belt from slipping off.
  • Guide the right side of the belt over the water pump and then position the belt on the crankshaft pulley cogs. There should be little to no slack when this is done. If so, the belt may be loose by one cog.
  • While holding the belt in place over the crankshaft pulley with the right hand, use the left hand to slip the left side of the belt over the tensioner pulley.
  • Bolt on the timing belt tensioner. Applying equal turns on each bolt will gradually compress the tensioner pin against the tensioner pulley assembly. As this occurs, the timing belt will tighten up.
  • Optional – At this point the car can be started to check for belt alignment. If the car misfires or the Check Engine light were to come on, turn off the car, connect the crankshaft pulley bolt and rotate the engine with a ratchet wrench to the alignment marks. Being off by one cog will cause an engine misfire. This is usually between the right camshaft and the crankshaft.
  • Reverse the outlined instructions to reconnect removed components as outlined in the last thumbnail photo in this article. The Crankshaft Pulley Bolt can be ‘shocked’ torqued on with a Mechanical Impact Driver if either an air or electrically powered impact driver is not available. This tool may be available for rent at a auto retailer; otherwise, you can always bring your car to a private garage to have them torque the bolt on for you. Usually they’ll do it for free out of professional courtesy.
  • If the power steering fluid was drained, pour in new fluid and turn the steering wheel right to left to create suction. The fluid level should drop, add more fluid and repeat procedure until the fluid level has stabilized.

Learn more about Timing Belt Replacement

What is a Timing Belt all about?

The timing belt is a rubber belt located in the engine compartment behind the drive belts. It’s job is to keep the crankshaft in sync with the camshaft(s), ensuring the proper timing and operation of the engines valves and therein, the engine.

Keep in mind

  • When replacing a timing belt, also replace the water pump, tensioner, and pulleys.
  • If the pulleys and tensioners should fail after only replacing the belt, it can cause valve or piston damage and lead to more expensive repairs, in order to have the engine run properly. It is therefore essential to replace the whole set.
  • We only replace the water pump if it is driven by the timing belt (true for 60% of the cars).

How it’s done:

  • Remove accessories needed to gain access to engine timing cover.
  • Remove engine timing cover, inspect timing belt and pulleys for needed parts.
  • Remove and replace timing belt, water pump, pulleys, and tensioners.
  • Reinstall timing cover and all removed parts.
  • Start engine and check for proper engine operation and engine timing, as well as for cooling system leaks.

Our recommendation:

Follow the maintenance schedule provided by the manufacturer and replace the timing belt as recommended. The timing belt drives the water pump in 60% of the cars. The labor cost of replacing the water pump is significantly higher than the cost of the pump. While replacing the timing belt, it is cost effective to replace the water pump. We highly recommend replacing the timing belt pulleys and tensioners. The tensioner applies pressure to the timing belt keeping it tight, while the pulleys keep the timing belt in line. These components are sealed units that contain bearings (they cannot be lubricated on a regular basis). The bearings wear out over time and may seize, causing the timing belt to come off, which can cause major internal engine damage.

What common symptoms indicate you may need to replace the Timing Belt?

  • Abnormal squeaking coming from the timing cover area.
  • If the timing belt breaks, the car will not start.

How important is this service?

Ignoring the replacement of a timing belt as a part of scheduled maintenance, could result in major engine failure down the road. You should not wait for your timing belt to break, it must be serviced regularly.

What Are the Potential Dangers and Costs of Not Replacing Your Timing Belt Regularly?

Expensive damage can be caused to your engine: Many timing belt engines are “interference motors”, which simply means that the valves would hit the pistons if not kept in proper timing. This is not a problem under normal operating conditions but if the timing belt were to break or jump off the gears, the valves of one or more cylinders would strike the pistons and cause severe and costly damage.

If your car has more than the recommended mileage on the timing belt, you may be operating your car on borrowed time and the cost of replacing the belt is MUCH cheaper than having to rebuild or replace the engine because of damage caused by a snapped/worn timing belt.

Parts can be hard to find to repair damage caused by a failed timing belt: It’s obvious that timing belt replacement as a preventive maintenance measure is often ignored. This is so prevalent, in fact, that many car manufacturers and engine parts manufacturers don’t stock major engine components for timing-belt engines after the required 5-7 years because there will be only a handful of these cars still on the road. It can be quite difficult to find crankshafts, pistons, connecting rods, camshafts and the like for these older engines due to the economic infeasibility for the manufacturers to continue producing these parts for the few cars that they estimate will still be on the road.

In fact, many car manufacturers don’t expect timing-belt driven engines to last through more than two timing belts or approximately 120,000-150,000 miles and, moreover, they actually expect many to be taken out of service with the original belt still installed. Sadly, there are hundreds of thousands of 85,000-90,000 mile timing belt cars in junkyards because the timing belt was never replaced. What a waste when these cars could still be enjoying a useful life had the owner just paid attention to the recommended mileage replacement intervals for the timing belt.

Timing Belt Tech Data and Replacement Intervals for Acura

Your timing belt should be replaced every 50-70,000 miles. Carmakers have specified the replacement intervals for timing belts. In this database you will find these timing belt replacement intervals along with a little technical information regarding the valve configuration – interference or non-interference. In an interference engine, the valves and piston share the same air space. They never touch, unless your timing belt breaks or skips, and this is a catastrophic failure that requires removing the head and replacing bent valves. Non-interference engines do not risk this contact if the timing belt goes. Nonetheless, either can leave you stranded, so regular timing belt replacement is very important.

Be sure to replace your timing belt at the required intervals for your Acura. Timing belt replacement is crucial to the life of your engine. Interference type engines can suffer expensive damage in the case of timing belt failure. Bent valves are not cheap to replace! Below are the timing belt maintenance intervals and info for Acura cars.

Audi Timing Belt Tech Data and Replacement Intervals

Your timing belt AUDI should be replaced every 50-70,000 miles. Carmakers have specified the replacement intervals for timing belts. In this database you will find these timing belt replacement intervals along with a little technical information regarding the valve configuration – interference or non-interference. In an interference engine, the valves and piston share the same air space. They never touch, unless your timing belt breaks or skips, and this is a catastrophic failure that requires removing the head and replacing bent valves. Non-interference engines do not risk this contact if the timing belt goes. Nonetheless, either can leave you stranded, so regular timing belt replacement is very important.

Be sure to replace your timing belt at the required intervals for your Audi. Timing belt replacement is crucial to the life of your engine. Interference type engines can suffer expensive damage in the case of timing belt failure. Bent valves are not cheap to replace! Below are the timing belt maintenance intervals and info for Audi cars.

Chrysler Timing Belt Tech Data and Replacement Intervals

Your timing belt should be replaced every 50-70,000 miles. Carmakers have specified the replacement intervals for timing belts. In this database you will find these timing belt replacement intervals along with a little technical information regarding the valve configuration – interference or non-interference. In an interference engine, the valves and piston share the same air space. They never touch, unless your timing belt breaks or skips, and this is a catastrophic failure that requires removing the head and replacing bent valves. Non-interference engines do not risk this contact if the timing belt goes. Nonetheless, either can leave you stranded, so regular timing belt replacement is very important.

Be sure to replace your timing belt at the required intervals for your Chrysler. Timing belt replacement is crucial to the life of your engine. Interference type engines can suffer expensive damage in the case of timing belt failure. Bent valves are not cheap to replace! Below are the timing belt maintenance intervals and info for Chrysler cars.

Daihatsu and Daewoo Timing Belt Tech Data and Replacement Intervals

Your timing belt should be replaced every 50-70,000 miles. Carmakers have specified the replacement intervals for timing belts. In this database you will find these timing belt replacement intervals along with a little technical information regarding the valve configuration – interference or non-interference. In an interference engine, the valves and piston share the same air space. They never touch, unless your timing belt breaks or skips, and this is a catastrophic failure that requires removing the head and replacing bent valves. Non-interference engines do not risk this contact if the timing belt goes. Nonetheless, either can leave you stranded, so regular timing belt replacement is very important.

Be sure to replace your timing belt at the required intervals for your Daewoo or Daihatsu. Timing belt replacement is crucial to the life of your engine. Interference type engines can suffer expensive damage in the case of timing belt failure. Bent valves are not cheap to replace! Below are the timing belt maintenance intervals and info for Daewoo or Daihatsu cars.

Ford Timing Belt Tech Data and Replacement Intervals

Your timing belt should be replaced every 50-70,000 miles. Carmakers have specified the replacement intervals for timing belts. In this database you will find these timing belt replacement intervals along with a little technical information regarding the valve configuration – interference or non-interference. In an interference engine, the valves and piston share the same air space. They never touch, unless your timing belt breaks or skips, and this is a catastrophic failure that requires removing the head and replacing bent valves. Non-interference engines do not risk this contact if the timing belt goes. Nonetheless, either can leave you stranded, so regular timing belt replacement is very important.


Be sure to replace your timing belt at the required intervals for your Ford. Timing belt replacement is crucial to the life of your engine. Interference type engines can suffer expensive damage in the case of timing belt failure. Bent valves are not cheap to replace! Below are the timing belt maintenance intervals and info for Ford cars.

Geo Timing Belt Tech Data and Replacement Intervals

Your timing belt should be replaced every 50-70,000 miles. Carmakers have specified the replacement intervals for timing belts. In this database you will find these timing belt replacement intervals along with a little technical information regarding the valve configuration – interference or non-interference. In an interference engine, the valves and piston share the same air space. They never touch, unless your timing belt breaks or skips, and this is a catastrophic failure that requires removing the head and replacing bent valves. Non-interference engines do not risk this contact if the timing belt goes. Nonetheless, either can leave you stranded, so regular timing belt replacement is very important.

Be sure to replace your timing belt at the required intervals for your Geo. Timing belt replacement is crucial to the life of your engine. Interference type engines can suffer expensive damage in the case of timing belt failure. Bent valves are not cheap to replace! Below are the timing belt maintenance intervals and info for Geo cars.

GM Timing Belt Tech Data and Replacement Intervals

Your timing belt should be replaced every 50-70,000 miles. Carmakers have specified the replacement intervals for timing belts. In this database you will find these timing belt replacement intervals along with a little technical information regarding the valve configuration – interference or non-interference. In an interference engine, the valves and piston share the same air space. They never touch, unless your timing belt breaks or skips, and this is a catastrophic failure that requires removing the head and replacing bent valves. Non-interference engines do not risk this contact if the timing belt goes. Nonetheless, either can leave you stranded, so regular timing belt replacement is very important.

Be sure to replace your timing belt at the required intervals for your General Motors vehicle. Timing belt replacement is crucial to the life of your engine. Interference type engines can suffer expensive damage in the case of timing belt failure. Bent valves are not cheap to replace! Below are the timing belt maintenance intervals and info for GM cars.